
Spring Boot Security 가이드 3편
Updated:
Front-End 접근 권한 설정
Spring Security 샘플 프로그램에서는 Thymeleaf로 Front를 구현했습니다.
Front에서도 Spring Security를 통해 접근을 제어할 수 있습니다.
아래는 접근 제어 예시인 index.html 입니다.
<!DOCTYPE html>
<html lang="en" xmlns:th="http://www.thymeleaf.org">
<head>
<meta http-equiv="Content-Type" content="text/html; charset=UTF-8" />
<title>Home</title>
<link rel="stylesheet" th:href="@{/css/base.css}" />
<link rel="stylesheet" th:href="@{/css/bootstrap.min.css}" />
</head>
<body>
    <div th:replace="layout/header::header"></div>

    <!--body-->
    <div class="container">
        <br />
        <br />
        <div class="jumbotron">
            <h1>ERS COMMON PAGE</h1>
            <p>안녕하세요, 환영합니다.</p>
            <br />
            <p align="left">
                <a sec:authorize="isAnonymous()" class="btn btn-primary btn-lg"
                    th:href="@{/login}">로그인</a>
                    <a sec:authorize="isAnonymous()" class="btn btn-primary btn-lg"
                    th:href="@{/signup}">회원가입</a>
                    <a sec:authorize="hasRole('ROLE_SYS_ADMIN')"
                    class="btn btn-primary btn-lg" th:href="@{/admin}">관리자 페이지</a>
                    <a sec:authorize="hasRole('ROLE_COUNSELOR')"
                    class="btn btn-primary btn-lg" th:href="@{/counselor}">상담관련 페이지</a>

            </p>
        </div>
    </div>
    <!--/body-->

    <div th:replace="layout/footer::footer"></div>
</body>
</html>
- Thymeleaf기준, sec:authorize=”” 를 통해 접속중인 유저의 권한에 따라 Menu Visible / Invisible 설정
CSRF Token
Spring Security를 적용하는 경우 Http Request를 주고받을 때, 해당 요청의 헤더에 CSRF 토큰이 포함되어있는지 필터링합니다.
따라서, Post/Put/Delete Request 시 반드시 요청 헤더에 CSRF 토큰을 포함해야합니다.
1. html 헤드에 Token 선언
users/form.html
<!DOCTYPE html>
<html lang="en" xmlns:th="http://www.thymeleaf.org">
<head>
    <meta http-equiv="Content-Type" content="text/html; charset=UTF-8" />
    <meta id="_csrf" name="_csrf" th:content="${_csrf.token}"/>
    <!-- default header name is X-CSRF-TOKEN -->
    <meta id="_csrf_header" name="_csrf_header" th:content="${_csrf.headerName}"/>
    <title>User Form</title>
    <link rel="stylesheet" th:href="@{/css/base.css}" />
    <link rel="stylesheet" th:href="@{/css/bootstrap.min.css}" />
</head>
<body>
- 5~7번 Line : csrf 토큰
2. Request 보내는 script에 Token 담기
<script>
        $('#insert').click(function () {
            var token = $("meta[name='_csrf']").attr("content");
            var header = $("meta[name='_csrf_header']").attr("content");
            var jsonData = JSON.stringify({
                name: $('#account_name').val(),
                email: $('#account_email').val(),
                password: $('#account_password').val(),
                roleName: $('#role_name option:selected').val()

            });
            $.ajax({
                       url: "http://localhost:8084/admin/usermanage/auth/new",
                       type: "POST",
                       data: jsonData,
                       contentType: "application/json",
                       dataType: "json",
                       beforeSend: function(xhr) {

                           xhr.setRequestHeader(header, token);

                         },
                           success: function (response) {
                               alert('사용자가 등록되었습니다');
                               location.href = '/admin/usermanage';
                       },
                       error: function (request,status,error) {
                           alert("code = "+ request.status + " message = " + request.responseText + " error = " + error);

                           //alert('저장 실패!');
                       }
                   });
        });
    </script>
-
3~4번 Line : ‘csrf’ 토큰의 ‘content’속성 값 불러옴
-
18~22번 Line : Post Request 전송 전, Request Header에 Token 저장
Tips
- csrf토큰 자동 추가 방법 (thymeleaf)
Post Request를 보내는 form 에 다음과 같이 th:action=”@{/requesturl}” 로 선언
<form th:action="@{/login}" method="post">
- form에 csrf토큰 추가
<form action="/user/login" method="post>
<input type="hidden" th:name="${}_csrf.parameterName}" th:value="${_csrf.token}"/>
권한별 Method 제한 방법
1. pom.xml 수정 - dependency 추가
<dependency>
            <groupId>cglib</groupId>
            <artifactId>cglib</artifactId>
            <version>2.2</version>
</dependency>
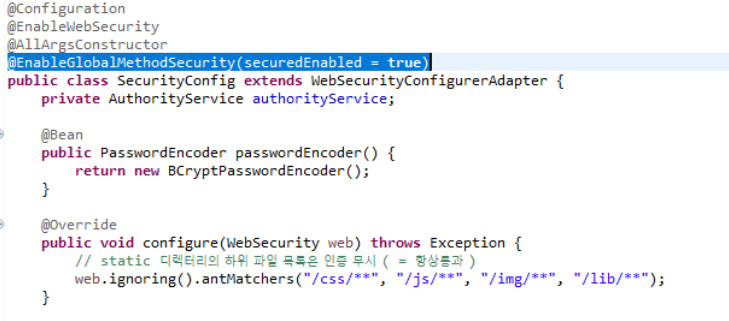
2. SecurityConfig에 @EnableGlobalMethodSecurity(securedEnabled = true) 추가
3. 제한할 Method 에 @Secured annotation 추가
//@secured test

    @Secured("ROLE_SYS_ADMIN") //여러개의 Role선언 가능@Secured({"ROLE_SYS_ADMIN", "ROLE_COUNSELOR"})
    @GetMapping("/secure/test")
    public String checkAuth( Model model, Authentication auth) {
        User account = (User) SecurityContextHolder.getContext().getAuthentication().getPrincipal();
         log.info("Welcome checkAuth! Authentication is {}.", auth);
         log.info("Account == {}.", account);
         model.addAttribute("auth", auth );
         model.addAttribute("account", account );
         return "/secured";
        }
→ Controller에 선언한 경우
→이때 User는 Userdetails의 User 이어야 한다.
4. 결과
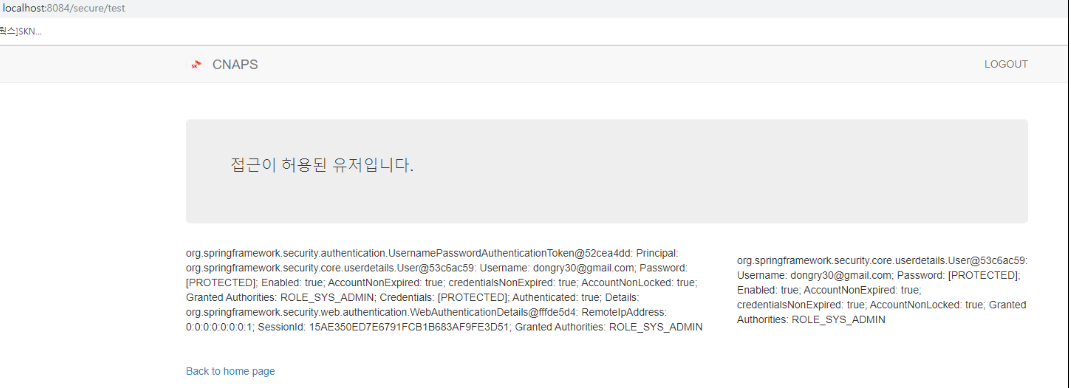
- SYS_ADMIN 권한을 가진 계정으로 test한 결과 : 접근 허용된 유저의 권한이 ROLE_SYS_ADMIN인 것을 확인할 수 있다.
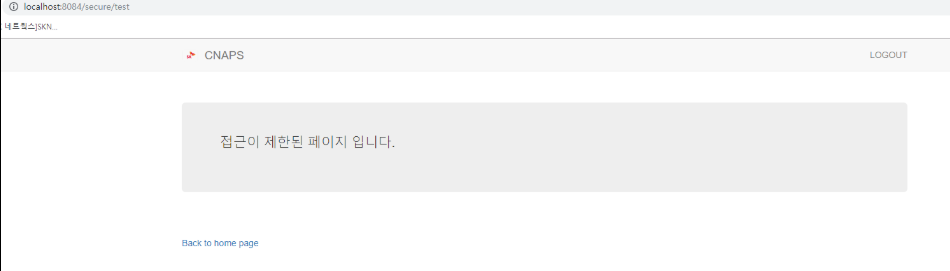
- SYS_ADMIN 권한이 없는 계정이 접근한 경우

5. 접근 거부 Exception Handle
3번의 메소드를 아래와 같이 수정
@GetMapping("/secure/test")
    public String checkAuth( Model model) {

         try {
             User account = authorityService.getUserInfo();

             log.info("Account == {}.", account);
             model.addAttribute("account", account );
             return "/secured";

            } catch(AccessDeniedException e) {
               log.warn("Unauthorized", e);
               return "/denied";
            }
        }
→ Controller 내부의 @Secured Annotation 삭제 → Try/Catch에서 AccessDeniedException 선언
AuthorityService.java
public interface AuthorityService extends UserDetailsService{

    /*****other method*****/

    User getUserInfo();
}
→ 이때 User는 Userdetails의 User 이어야 한다.
AuthorityLogic.java
@Secured("ROLE_SYS_ADMIN")
    public User getUserInfo() {
        User account = (User) SecurityContextHolder.getContext().getAuthentication().getPrincipal();
        return account;
    }
→ AuthorityService를 implements 하고 있는 Class인 AuthorityLogic내 해당 메소드에 @Secured Annotation 선언
6. 접근 거부 Exception Handle 결과
구현 코드는 변경되었을 수 있으니, 최종 코드는 반드시 아래의 프로젝트 Github주소를 참고하세요.
프로젝트 예제 Github 주소 :