
개발 역량 장착하기(3)-마이크로서비스 초간단 실습②
Updated:
2차시 교육 ② : 메시지 기반 비동기 통신 구현
지난 시간에는 Product Aggregation을 대상으로 아주아주 간단한 마이크로서비스를 개발해 보았습니다.
Product 마이크로서비스는 내부에 비즈니스 로직이 없고, 단순하게 상품이 새로 등록되거나 price, quantity 같은 내부 속성을 변경하는 CRUD 기능만 있는 마이크로서비스입니다. 이 상품에 대하여 주문하거나 배송하는 로직은 Order나 Delivery와 같은 마이크로서비스에서 구현이 될 예정입니다.
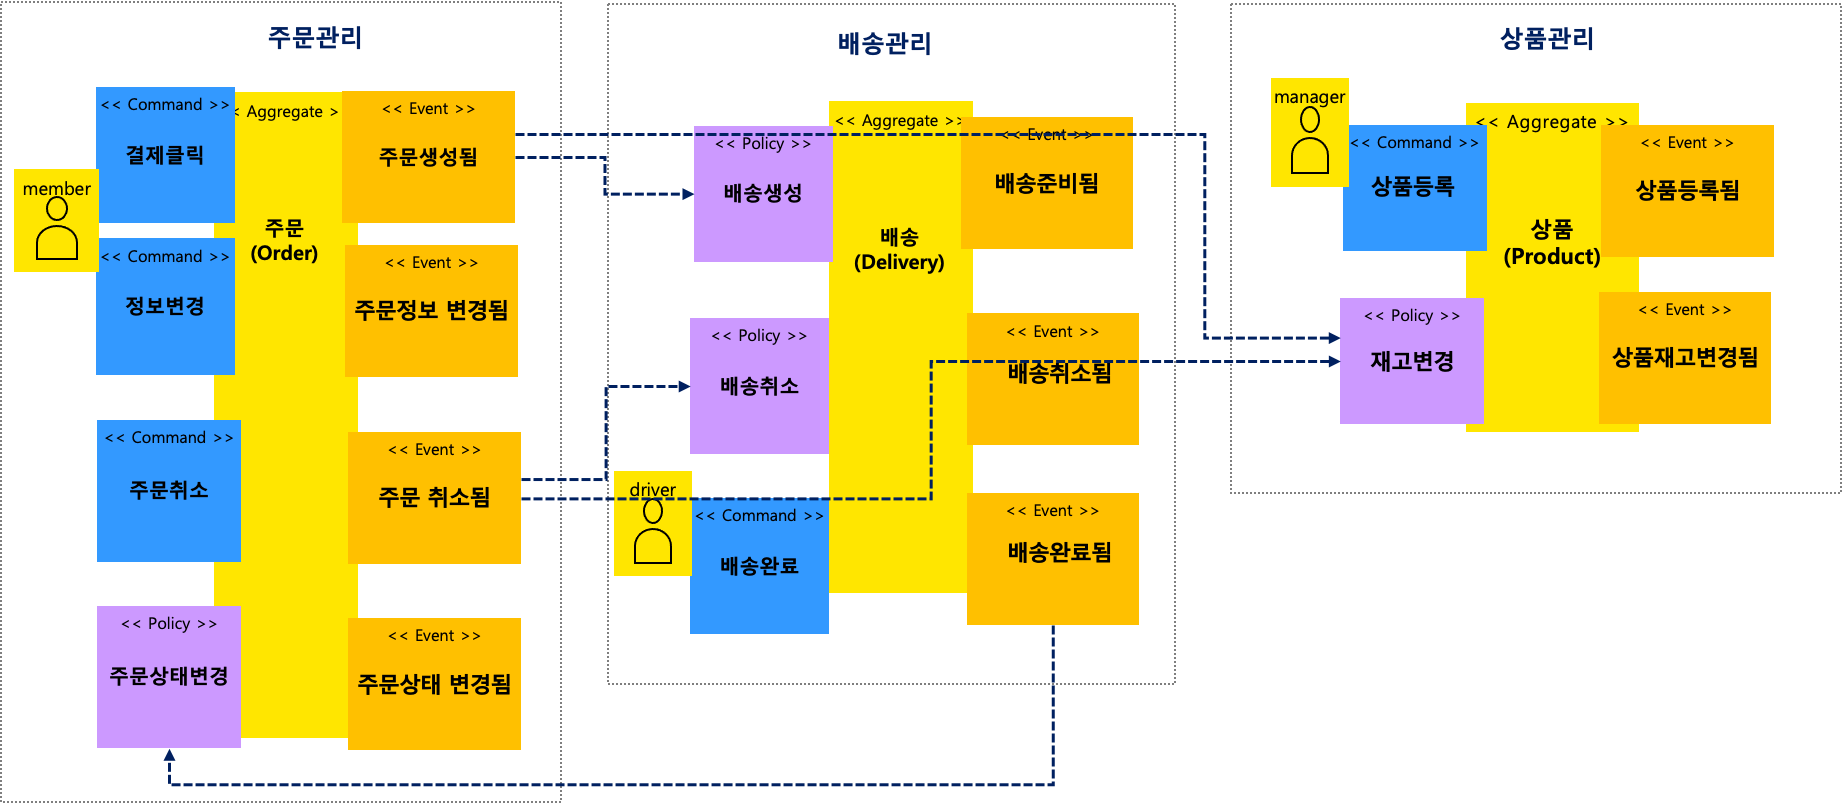
이 부분은 지난 이벤트스토밍 다이어그램에서 확인할 수 있습니다.
이번에는 Order와 Delivery 마이크로서비스를 개발해 보도록 하겠습니다.
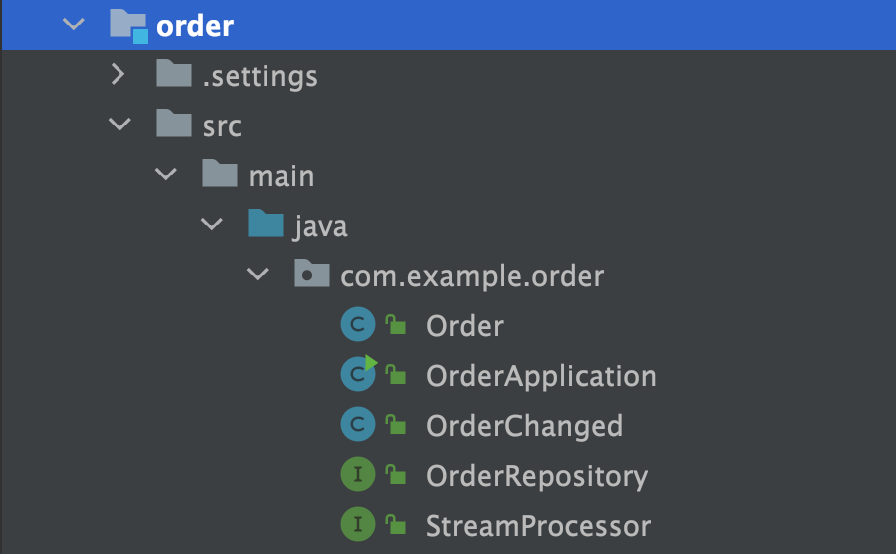
Order와 Delivery 마이크로서비스를 코딩으로 구현하기 위해서 지난 시간에 개발한 Product와 비슷하게 프로젝트 파일과 Class 파일들을 생성합니다.
| Product | Order | Delivery |
|---|---|---|
 |
 |
 |
order 마이크로서비스 구현
이제 각각 Order와 Delivery 내부의 로직을 아래와 같이 코딩합니다.
order 관련 클래스 만들기
- Order.java
  @Entity
  @Table(name="Orders")
  public class Order {
      @Id
      @GeneratedValue(strategy=GenerationType.AUTO)
      private Long id;  // =orderId
      private Long productId;
      private String productName;
      private Long userId;
      private int qty;
      private int price;

      public Long getId() {
          return id;
      }
      public void setId(Long id) {
          this.id = id;
      }

      public Long getProductId() {
          return productId;
      }
      public void setProductId(Long productId) {
          this.productId = productId;
      }

      public String getProductName() {
          return productName;
      }
      public void setProductName(String productName) {
          this.productName = productName;
      }

      public Long getUserId() {return userId;}
      public void setUserId(Long userId) {this.userId = userId;}

      public int getQty() { return qty; }
      public void setQty(int qty) {
          this.qty = qty;
      }

      public int getPrice() {return price;}
      public void setPrice(int price) {this.price = price;}

      @PostPersist @PostUpdate
      public void eventPublish(){
          ...
      }

  }
위에서 order.java 클래스 앞에 @Table(name=”Orders”)라고 하는 이유는 order라는 용어가 SQL에서 reserved 되어 있기 때문입니다. 즉 테이블 명칭을 order로는 만들 수 없기 때문에 orders로 바꾸어 사용해야 합니다.
- OrderChanged.java
public class OrderChanged { String eventType; private Long id; private Long productId; private String productName; private Long userId; private int qty; private int price public OrderChanged(){ this.eventType = this.getClass().getSimpleName(); } public Long getId() { return id; } public void setId(Long id) { this.id = id; } public Long getProductId() { return productId; } public void setProductId(Long productId) { this.productId = productId; } public String getProductName() { return productName; } public void setProductName(String productName) { this.productName = productName; } public Long getUserId() {return userId;} public void setUserId(Long userId) {this.userId = userId;} public int getQty() { return qty; } public void setQty(int qty) { this.qty = qty; } public int getPrice() {return price;} public void setPrice(int price) {this.price = price;} } - OrderRepository.java
public interface OrderRepository extends CrudRepository<Order, Long> { } - OrderApplication.java
  @EnableBinding(StreamProcessor.class)
  @SpringBootApplication
  public class OrderApplication {

      public static ApplicationContext applicationContext;

      public static void main(String[] args) {
          applicationContext = SpringApplication.run(OrderApplication.class, args);
      }

  }
이벤트 발생 로직 리팩토링 (EventPublisher 활용)
Order 내부의 eventPublish에서 orderChanged 이벤트를 처리하기 위한 로직을 조금 손을 봐야 하는 것 외에는, Order 클래스가 가진 속성에 따라 property와 method 명칭을 바꾸는 것 외에 product에서 만들었던 로직과 크게 다를 것이 없습니다.
단, 이벤트 발행이 추가될 때마다 eventPublish 내부 로직을 많이 바꾸어야 하기 때문에 이에 대한 부분을 다음과 같이 리팩토링하여 변경을 최소화할 필요가 있습니다.
- 먼저 이벤트 발행 로직을 담당하는 EventPublisher 클래스를 생성합니다.
public class EventPublisher { String eventType; String timestamp; public EventPublisher(){ this.setEventType(this.getClass().getSimpleName()); SimpleDateFormat defaultSimpleDateFormat = new SimpleDateFormat("YYYYMMddHHmmss"); this.timestamp = defaultSimpleDateFormat.format(new Date()); } public String toJson(){ ObjectMapper objectMapper = new ObjectMapper(); String json = null; try { json = objectMapper.writeValueAsString(this); } catch (JsonProcessingException e) { throw new RuntimeException("JSON format exception", e); } return json; } public void publish(String json){ if( json != null ){ /** * spring streams 방식 */ StreamProcessor processor = OrderApplication.applicationContext.getBean(StreamProcessor.class); MessageChannel outputChannel = processor.output(); outputChannel.send(MessageBuilder .withPayload(json) .setHeader(MessageHeaders.CONTENT_TYPE, MimeTypeUtils.APPLICATION_JSON) .build()); } } public void publish(){ this.publish(this.toJson()); } public void publishAfterCommit(){ TransactionSynchronizationManager.registerSynchronization(new TransactionSynchronizationAdapter() { @Override public void afterCompletion(int status) { EventPublisher.this.publish(); } }); } public String getEventType() { return eventType; } public void setEventType(String eventType) { this.eventType = eventType; } public String getTimestamp() { return timestamp; } public void setTimestamp(String timestamp) { this.timestamp = timestamp; } public boolean isMe(){ return getEventType().equals(getClass().getSimpleName()); } } - 다음엔 OrderChanged가 이 EventPublisher를 상속받도록 수정합니다.
public class OrderChanged extends EventPublisher {
  ...
}
eventType은 부모인 EventPublisher 클래스 안으로 옮겨갔으므로 OrderChanged에서는 삭제합니다.
- 마지막으로 Order의 eventPublish 로직을 다음과 같이 수정합니다.
  @PostPersist @PostUpdate
  public void onChanged() {
      OrderChanged orderChanged = new OrderChanged();
      BeanUtils.copyProperties(this, orderChanged);
      orderChanged.publishAfterCommit();
  }
위에서 BeanUtil.copyProperties은 spring framwork에서 제공하는 API로 클래스의 속성을 카피해줍니다. 즉, Order가 생성되거나 변경될 때 해당 속성 값을 OrderChanged라는 POJO 클래스에 복사하게 됩니다. 그리고 OrderChanged는 publishAfterCommit 메소드를 통하여 자기 자신을 이벤트 메시지로써 카프카에 전달합니다.
이벤트 추가
product 마이크로서비스를 처음 만들었던 때와 비슷한 작업을 거쳐 Order 마이크로서비스를 비슷하게 만들었습니다.
지난번에는 아주아주 심플하게 하느라 비즈니스에는 신경쓰지 않았지만 이제부터는 조금 더 신경을 써줘야 할 것 같습니다. 실제 비즈니스 현실에서는 주문변경 이전에 먼저 주문생성이 있어야 합니다. 또한 주문을 직접 변경하기 보다는 주문취소를 하고 주문을 다시 생성하는 경우가 많습니다.
따라서, OrderChanged 클래스의 명칭을 OrderPlaced로 변경하고 또한 이를 복사하여 OrderCancelled 명칭으로 클래스를 추가합니다.
OrderChanged가 OrderPlaced로 변경됨에 따라 Order.java 안에서도 다음과 같이 변경되어야 합니다.
- Order.java
@PostPersist //PostUpdate는 제거 public void onPersist() { OrderPlaced orderPlaced = new OrderPlaced(); BeanUtils.copyProperties(this, orderPlaced); orderPlaced.publishAfterCommit(); } - OrderCancelled.java
  public class OrderCancelled extends EventPublisher {
      private Long id;
      private Long productId;
      private String productName;
      private Long userId;
      private int qty;
      private int price;

      public Long getId() {
          return id;
      }
      public void setId(Long id) {
          this.id = id;
      }

      public Long getProductId() {
          return productId;
      }
      public void setProductId(Long productId) {
          this.productId = productId;
      }

      public String getProductName() {
          return productName;
      }
      public void setProductName(String productName) {
          this.productName = productName;
      }

      public Long getUserId() {return userId;}
      public void setUserId(Long userId) {this.userId = userId;}

      public int getQty() { return qty; }
      public void setQty(int qty) {
          this.qty = qty;
      }

      public int getPrice() {return price;}
      public void setPrice(int price) {this.price = price;}
  }
주문이 취소되었을 때 OrderCancelled 이벤트가 발생하려면 Order 엔티티가 제거될 때 해당 로직이 동작해야 하는데, 이 부분은 @PostRemove 어노테이션을 사용하여 Trigger하도록 구현할 수 있습니다.
- Order.java에 다음을 추가
  ...
      @PostRemove
      public void onRemoved() {
          OrderCancelled orderCanceled = new OrderCancelled();
          BeanUtils.copyProperties(this, orderCanceled);
          orderCanceled.publishAfterCommit();
      }
application.yaml 수정
마지막으로 order 마이크로서비스가 기동될 수 있도록 application.yaml 파일을 수정합니다. 기존 product의 yaml 파일과 다른 부분은 stream binding을 위한 group 명칭과 http 리스너 port 입니다.
spring:
  profiles: default
  jpa:
    properties:
      hibernate:
        show_sql: true
        format_sql: true
  h2:
    console:
      enabled: true
  cloud:
    stream:
      kafka:
        binder:
          brokers: localhost:9092
      bindings:
        input:
          group: order
          destination: shop
          contentType: application/json
        output:
          destination: shop
          contentType: application/json
logging:
  level:
    org.hibernate.type: trace
    org.springframework.cloud: debug
server:
  port: 8081
order 마이크로서비스 테스트
이제, 개발된 코드들이 잘 동작되는지 order 마이크로서비스를 실행해 봅니다.
- 스프링 부트 실행
~/.../order ❯❯ mvn spring-boot:run ... - order REST API 실행
  ~ ❯❯ http POST localhost:8081/orders productName="socks" productId=1 qty=5
  HTTP/1.1 201
  Connection: keep-alive
  Content-Type: application/json
  Date: Thu, 18 Nov 2021 05:41:17 GMT
  Keep-Alive: timeout=60
  Location: http://localhost:8081/orders/1
  Transfer-Encoding: chunked
  Vary: Origin, Access-Control-Request-Method, Access-Control-Request-Headers
  {
      "_links": {
          "order": {
              "href": "http://localhost:8081/orders/1"
          },
          "self": {
              "href": "http://localhost:8081/orders/1"
          }
      },
      "productId": 1,
      "productName": "socks",
      "qty": 5
  }
  ...
delivery 마이크로서비스 구현
위와 같은 방식으로 이번에는 delivery 마이크로서비스를 구현해 봅니다. Delivery 클래스가 가져야 할 속성값은 지난 포스팅에서 언급한 것과 같이 “deliveryId / orderId / userId / deliveryAddress”를 사용합니다.
자, 이제 기본적인 마이크로서비스 구현이 완료되었습니다. 과연 그럴까요? 무언가 아쉽습니다.
지난번 포스팅 말미에서 언급하였듯이 하나의 마이크로서비스에서 발생시킨 이벤트가 다른 마이크로서비스로 전달되어야 하는데, 이 부분이 아직 구현되지 않았네요.
이벤트 수신 처리
이벤트 수신을 위해서는 추가적인 클래스가 더 필요합니다. 즉, order에서 새로운 주문이 발생하면 delivery에 배송준비를 등록하고, product에서는 재고가 줄어들도록 처리하는 이벤트 처리기(EventHandler)가 개발되어야 합니다. 그리고 이는 지난 이벤트스토밍에서 언급했던 Policy에 해당하는 부분입니다.
각각의 이벤트와 Policy가 어떻게 연결되는지 보기 위해 이벤트스토밍 다이어그램에 아래와 같이 붉은색 선을 추가하였습니다.
 (이제보니 추가적인 Policy가 몇 개 더 필요하지만, 여기서는 간단하게 요정도만 표시합니다.)
일단 주문이 생성되면 delivery 서비스에서 배송을 준비하는 로직을 만들어보도록 하겠습니다. 배송을 준비한다는 말은 곧 Delivery 엔티티가 생성됨을 의미합니다.
- EventHandler.java (delivery 서비스)
  @Service
  public class EventHandler {
      @Autowired DeliveryRepository deliveryRepository;

      @StreamListener(StreamProcessor.INPUT)
      public void onOrderChanged_startDelivery(@Payload OrderPlaced orderPlaced){

          if(orderPlaced.isMe()){
              System.out.println("##### listener StartDelivery : " + orderPlaced.toJson());
              Delivery delivery = new Delivery();
              delivery.setOrderId(orderPlaced.getId());
              delivery.setProductId(orderPlaced.getProductId());
              delivery.setProductName(orderPlaced.getProductName());
              delivery.setUserId(orderPlaced.getUserId());
              deliveryRepository.save(delivery);
          }
      }
  }
Order 마이크로서비스가 로딩되면서 EventHandler가 바로 동작되어야 하기 때문에 @Service 어노테이션을 사용합니다.
이벤트 연동 테스트
이벤트가 잘 수신처리되는지 테스트하여 확인해보도록 하겠습니다.
- order 및 delivery 상태 확인
  ~ ❯❯ http localhost:8081/orders
  HTTP/1.1 200
  Connection: keep-alive
  Content-Type: application/hal+json
  Date: Thu, 18 Nov 2021 06:33:14 GMT
  Keep-Alive: timeout=60
  Transfer-Encoding: chunked
  Vary: Origin, Access-Control-Request-Method, Access-Control-Request-Headers

  {
      "_embedded": {
          "orders": []
      },
      "_links": {
          "profile": {
              "href": "http://localhost:8081/profile/orders"
          },
          "self": {
              "href": "http://localhost:8081/orders"
          }
      }
  }

  ~ ❯❯ http localhost:8082/deliveries
  HTTP/1.1 200
  Connection: keep-alive
  Content-Type: application/hal+json
  Date: Thu, 18 Nov 2021 06:32:52 GMT
  Keep-Alive: timeout=60
  Transfer-Encoding: chunked
  Vary: Origin, Access-Control-Request-Method, Access-Control-Request-Headers

  {
      "_embedded": {
          "deliveries": []
      },
      "_links": {
          "profile": {
              "href": "http://localhost:8082/profile/deliveries"
          },
          "self": {
              "href": "http://localhost:8082/deliveries"
          }
      }
  }
(둘 다 아무 것도 없음)
- 주문 생성
~ ❯❯ http POST localhost:8081/orders productName="socks" productId=1 qty=5 HTTP/1.1 201 Connection: keep-alive Content-Type: application/json Date: Thu, 18 Nov 2021 06:33:24 GMT Keep-Alive: timeout=60 Location: http://localhost:8081/orders/1 Transfer-Encoding: chunked Vary: Origin, Access-Control-Request-Method, Access-Control-Request-Headers { "_links": { "order": { "href": "http://localhost:8081/orders/1" }, "self": { "href": "http://localhost:8081/orders/1" } }, "price": 0, "productId": 1, "productName": "socks", "qty": 5, "userId": null } - delivery 확인
  ~ ❯❯ http localhost:8082/deliveries
  HTTP/1.1 200
  Connection: keep-alive
  Content-Type: application/hal+json
  Date: Thu, 18 Nov 2021 06:33:32 GMT
  Keep-Alive: timeout=60
  Transfer-Encoding: chunked
  Vary: Origin, Access-Control-Request-Method, Access-Control-Request-Headers

  {
      "_embedded": {
          "deliveries": [
              {
                  "_links": {
                      "delivery": {
                          "href": "http://localhost:8082/deliveries/1"
                      },
                      "self": {
                          "href": "http://localhost:8082/deliveries/1"
                      }
                  },
                  "orderId": 1,
                  "productId": 1,
                  "productName": "socks",
                  "userId": null
              }
          ]
      },
      "_links": {
          "profile": {
              "href": "http://localhost:8082/profile/deliveries"
          },
          "self": {
              "href": "http://localhost:8082/deliveries"
          }
      }
  }
delivery쪽에 배송을 위한 정보가 등록되었네요. ^^ 마이크로서비스간 서로 이벤트메시지를 통해 정보가 동기화되기 시작한 것입니다. 오래 시간이 걸렸지만 이로써 아주 간단한 제대로 된 마이크로서비스 구현체를 경험해 보았습니다.
이렇게 이벤트 메시지를 주고 받음으로 서로간 정보를 연동하는 것을 Pub/Sub 통신이라고 합니다. 또는 비동기방식(Asnc) 연동이라고도 합니다.
마이크로서비스 구조에서 비동기 통신만 가능한 것은 아닙니다.
다음 포스팅에서는 동기 방식으로 연동하는 것을 구현해 보겠습니다.
- 참고한 사이트
- 관련 소스 다운받기
< EOF >